Duck Pond Redneckery


Resistors aren't voltage limited, although doubling the working voltage in a circuit without resizing the components usually leads to...

blowing yerself up! :D

14.5V/3.5 (supposed ta be)A is...

4.14 ohms, total circuit resistance.

So you're looking at a 3-ohm ballast resistor...

(3.5A)^2 * 3-ohms = 36.75 Watts or better power rating.

Unless you really like the glowie thingy effect.

:nails:
The ballast resistor was only put on the tractor because in the 1930's when the circuit was actually designed, they didn't have good batteries and when the starter load was applied, voltage dropped so much you couldn't get any spark to get it started.

So they designed the ignition system for 3 volts, ...

Under starter load, when the ballast resistor and everything is cold, it's 0.6 ohms. After a minute or so, it warms up and increases it's resistance to effectively lower the (now) 7.2 volts or whatever to roughly 3 volts so it doesn't cook the coil.

I don't think it's supposed to "warm up" to "glowing f*ing orange" though. :toothpick:

No idea if that permanently damaged the resistance values. The only way I can tell is if it's still 0.6 ohms at 68 degrees F. No idea what temperature it's supposed to normally run at though.

A new ballast resistor is $13.28 at Yesterday's Tractor but I don't think I'll go that route if mine is toast. Especially when I can just go get a resistor from NAPA, or just gut my inferior "square can" coil and run it's terminal leads out to a modern 12 volt oil-filled 3 ohm ignition coil like the one I was staring at last week at Farm & Fleet.

3 ohm coil, plus the 1 ohm ceramic resistor that came with the 12 volt conversion kit and I'm in business.

Screw that OEM ballast resistor that doubles as a cigarette lighter. I don't need it, .. I always have a Bic in my pocket. o_O
 
I just got a new multi-meter.

My Harbor Freight POS was showing 0.8 ohms when I touch the two leads together, .... I opened it up to see if there's a calibration screw inside but no. I put a new battery in it and now it's showing like 2.8 ohms .... whatever, ... it's junk.

So the new one reads 0.1 ohms and if I spit on the probes, it'll actually zero out.


So I checked my 12 volt coil, ... 3 ohms.

The ballast resistor that's supposed to be 0.6 ohms at 68 degrees F is 0.5 at 60 degrees. Close enough. It supposedly goes up to 1 ohm when it "warms up".

That resistor that came with the 12 volt kit, .... f*ing 5 ohms. So if I'd followed it's instructions and used the 12 volt coil with it, it would be 8.6 freakin' ohms. What the hell were they smoking?

Anyway so later on I'm just going to take the 6V coil off and put the 12 volt one on, wired the same way the 6V one is wired now. Oughta give me 3.5 ohms then "warm up" to 4 ohms right where it's supposed to be.
 
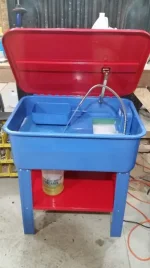
I used water based solvent so it's not a fire hazard.

Shoulda used the good stuff. It's slow...

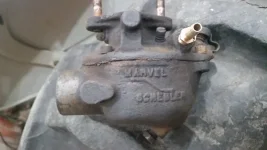
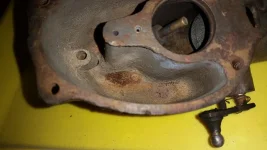
But I got this thing clean enough to discover it's part number.

20170502_204834.webp

TSX33. Now I can order a gasket set for it.

:yippee-1:

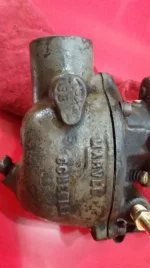
It was leaking out this weep hole in the bottom. Like fast, a steady stream.

20170502_211003.webp

Float looks fine, needle and seat look brand new.

My guess is a piece of grit got in there and held the needle valve open.

No bubbles when I hold the float submerged, no rattling when I shake it next to my ear after I dry it off.
 
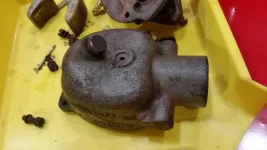
That's rust in the bottom. Not rust as in sediment that got in there, I mean the interior of the float bowl is rusted.

Gonna be a pain in the ass to clean it out.

20170502_212149.webp
 
I found a pencil and one of these things.

2294.webp

Chucked it up in the drill.

Worked OK but as you would expect, it wore out quickly.

Got it almost clean enough to say "good enough". Almost...

Tomorrow maybe I'll task the Geezer on it. He's actually got patience for stuff like that.
 
That's rust in the bottom. Not rust as in sediment that got in there, I mean the interior of the float bowl is rusted.

Gonna be a pain in the ass to clean it out.

View attachment 40183
i am wondering if there is an epoxy, impervious to gasoline, (maybe even a mix of gasohol) that you can coat the inside of that carb. that rust at the bottom, almost seems to be hiding a rust-through hole. that metal may also be porous as well.
 
I used water based solvent so it's not a fire hazard.

Shoulda used the good stuff. It's slow...

But I got this thing clean enough to discover it's part number.

View attachment 40181

TSX33. Now I can order a gasket set for it.

:yippee-1:

It was leaking out this weep hole in the bottom. Like fast, a steady stream.

View attachment 40182

Float looks fine, needle and seat look brand new.

My guess is a piece of grit got in there and held the needle valve open.

No bubbles when I hold the float submerged, no rattling when I shake it next to my ear after I dry it off.
in all my years of rebuilding carbs, i have never seen a "weep hole" in any of them. what i have seen is, the stainless ball plug had fallen out. the holes are drilled in the carb to allow for the passageways needed for gas flow, then plugged up, with said stainless steel ball plug. VW's were famous for NOT having such a plug, (just above the distributor) but rather a cup shaped one, not of stainless steel, which would fall out, and gas poured all over the distributor...then....."poof", instant BBQ grill......
 
i am wondering if there is an epoxy, impervious to gasoline, (maybe even a mix of gasohol) that you can coat the inside of that carb. that rust at the bottom, almost seems to be hiding a rust-through hole. that metal may also be porous as well.
There is a hole. It's drilled in there. It's where the gas goes out when you remove the drain plug.
in all my years of rebuilding carbs, i have never seen a "weep hole" in any of them. what i have seen is, the stainless ball plug had fallen out. the holes are drilled in the carb to allow for the passageways needed for gas flow, then plugged up, with said stainless steel ball plug. VW's were famous for NOT having such a plug, (just above the distributor) but rather a cup shaped one, not of stainless steel, which would fall out, and gas poured all over the distributor...then....."poof", instant BBQ grill......
That hole is about 1/16" and it's below the air intake part. Not the float chamber.

I'll post that pic on the tractor forum in case it's supposed to be plugged but if it wasn't for that little hole, if the float gets stuck and I forget to shut off the tank valve, it'll end up filling the crankcase full of gasoline because there's nowhere else for it to go.
 
There is a hole. It's drilled in there. It's where the gas goes out when you remove the drain plug.

That hole is about 1/16" and it's below the air intake part. Not the float chamber.

I'll post that pic on the tractor forum in case it's supposed to be plugged but if it wasn't for that little hole, if the float gets stuck and I forget to shut off the tank valve, it'll end up filling the crankcase full of gasoline because there's nowhere else for it to go.
ok...i thought it strange to have a hole with no plug.

thanks
 
My Redneck Express tractor has a 12.5 hp Briggs engine.

It's crankcase fills with gas every time I forget to shut it's gas valve off. There's no overflow drain.

Of course, I'd rather have it fill the crankcase than leak out all over the floor in the barn.
 
Well I sort of half-ass rebuilt the carb.

New float, adjusted, new float needle and seat, cleaned it thoroughly (had a machine shop sandblast the inside of the float bowl) replaced the idle air mixture screw because it came with the 12 dollar "basic" rebuild kit, and new gaskets.

Damn thing wouldn't start unless I either sprayed ether or was holding my hand over the intake. Full choke wasn't enough because there's a little spring-loaded trap door in the choke butterfly.

I eventually got it to stay running on it's own, half throttle. But it would bog if I advanced the throttle too quickly, and it would die if I tried to put any load on it at all, even gentle feathering of the clutch at full throttle in 1st gear, .. or even deadlocking the hydraulics.

I kept richening the air-fuel jet until it was totally out of the carb. At that point, with the freakin' main jet IN MY POCKET, .. it was able to handle a load and I drove it around the yard a little bit.

And noticed both of my main lift cylinders on the loader are leaking at the seals. :mad:


I just now realized I forgot to put the venturi back in the carb. o_O

That's the little brass cylinder that sets in the main air passage with a skinny spot in the middle right before the fuel jet sprays gas into the airflow. It's what creates the suction to pull gas through the main jet.

It was idling without it too. :confused:
 
Runs like a champ now. I think it might have slightly more power than before but it's hard to tell, because it's a tractor with a top speed of like 9 mph.

Probably gonna road-trip it Monday. Gonna drive it into town to Miller Hydraulic and get those lift cylinders rebuilt.

Or just take them off and bring them there. It takes like 3 minutes to take them off. ;)
 

Back
Top